Continued from Chapter 4
Preface and Scenario
Welcome back to another installment of my first Bag the Hun campaign. If this is the first time you’re reading about it, I recommend going back and catching up here if you want the full story. Today we see our protagonists of the fictional VF-2 mount a defense of their carrier (the fictional USS Lake Erie) once again. This scenario was inspired by the mid-afternoon attack by aircraft from the Hiryu on the USS Yorktown. If you are familiar with the history of Midway will know that this attack was successful and that soon after the crew of the Yorktown were ordered to abandon ship. Hopefully the pilots of VF-2 can produce a different result. They will begin the scenario facing two flights of enemy Nakajima B5N2 Type 97 Carrier Attack Bombers, better known by the later allied reporting name “Kate” escorted by Zero fighters. The pilots of VF-2 are down to only five Wildcats of their own, so this time Evan, Ben, Dan, Bastard and Priest take to the air to defend the Lake Erie. We once again have a named character on the Japanese side: Kanai Isoruko. He is a highly decorated bomber pilot and this is not his first attack on allied ships.
Order of Battle
VF-2
Flight One
Lt. Evan Richards / Veteran / F4F-4 Wildcat
Ens. Vincent Priest / Regular / F4F-4 Wildcat
Flight Two
Ens. Ben Wilson / Junior Ace / F4F-4 Wildcat
Ens. Dan Fletcher / Veteran/ F4F-4 Wildcat
Ens. Dick “Bastard” Blanchard / Regular / F4F-4 Wildcat
IJNAS Attackers
First Shotai
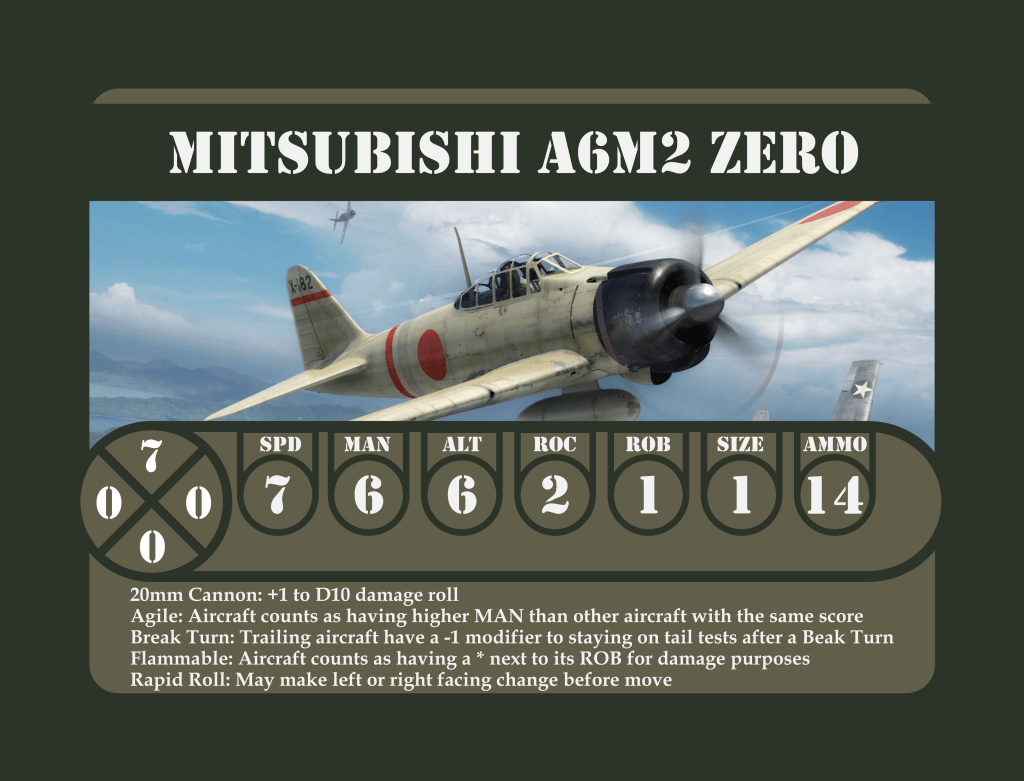
Zero One / Veteran / A6M2 Zero
Zero Two / Veteran / A6M2 Zero
Zero Three / Veteran / A6M2 Zero
Second Shotai
Zero Four / Veteran / A6M2 Zero
Zero Five / Sprog / A6M2 Zero
Zero Six / Veteran / A6M2 Zero
Third Shotai
Kate One / Kanai Isoruko / Top Ace / B5N2 Kate / 1x Torpedo
Kate Two / Average / B5N2 Kate / 1x Torpedo
Kate Three / Veteran / B5N2 Kate / 1x Torpedo
Fourth Shotai
Kate Four / Veteran / B5N2 Kate / 1x Torpedo
Kate Five / Sprog / B5N2 Kate / 1x Torpedo
Kate Six / Average / B5N2 Kate / 1x Torpedo


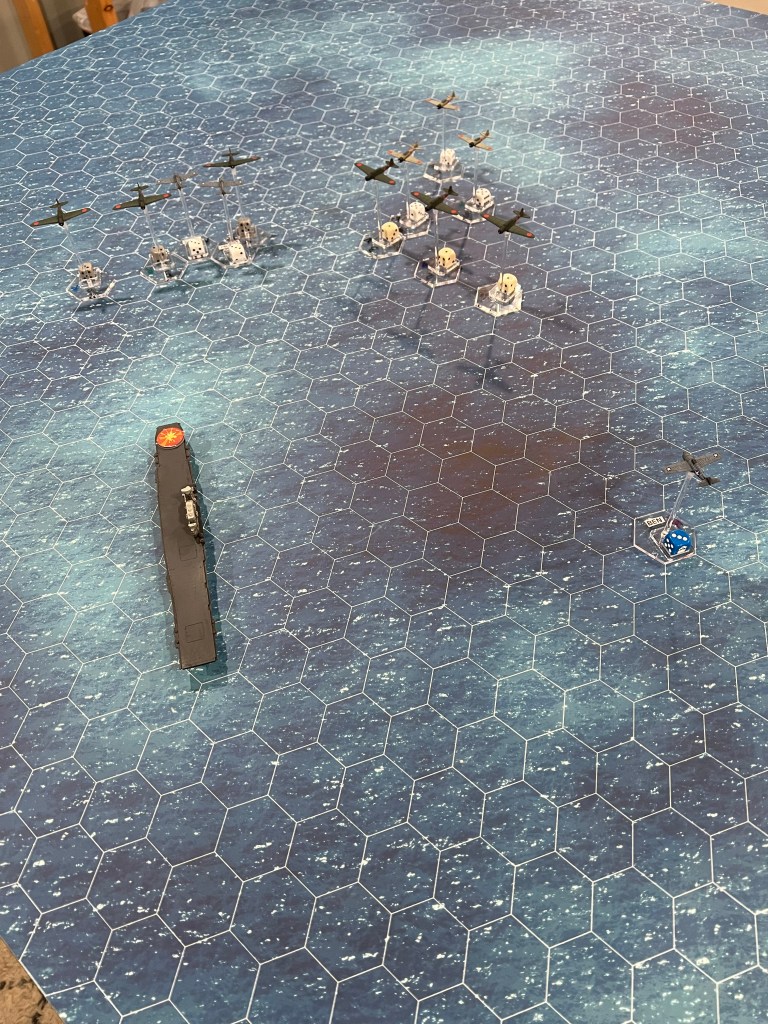
Ensign Ben Wilson rubs his eyes and squeezes them tight. It has been a long day and the fatigue is catching up with him. He opens his eyes and scans the horizon. He knows there are more enemies inbound and he knows he should spot them soon… Suddenly a glint catches his eye, one o’clock high. He looks harder “one, two, three…six.” Six enemy planes closing rapidly. He calls to Dan and Bastard on the radio and they advance their throttles turning towards the incoming hostiles and climbing. Ben stifles a yawn as he tests his guns.
Kanai Isoroku saw the ship first, a carrier, easy to spot from the smoke coming from some sort of damage towards the bow. “Wounded already, even easier” he thinks to himself as he signals his flight of torpedo bombers to turn right and fly parallel to the carrier until he can line up an attack. He also begins a descent, building up speed. He sees three American fighters high and left, about to tangle with his escort. “Good” he thinks. That’s why the fighters are there.
Another flight of Kates with Zero escorts approaches the USS Lake Erie from the north, setting up to attack the carrier head on. That was their assignment for the battle plan and they are prepared to execute it, they begin a shallow descent for the attack.
Evan Richards and Vincent Priest are still climbing when they hear Ben, Dan and Bastard turn for the attack. Like Ben they are exhausted and like Ben they spot an approaching wave of bombers and fighters. Evan tells Priest they are going to go after the bombers, forget the fighters for now. They turn towards the quickly approaching enemy.
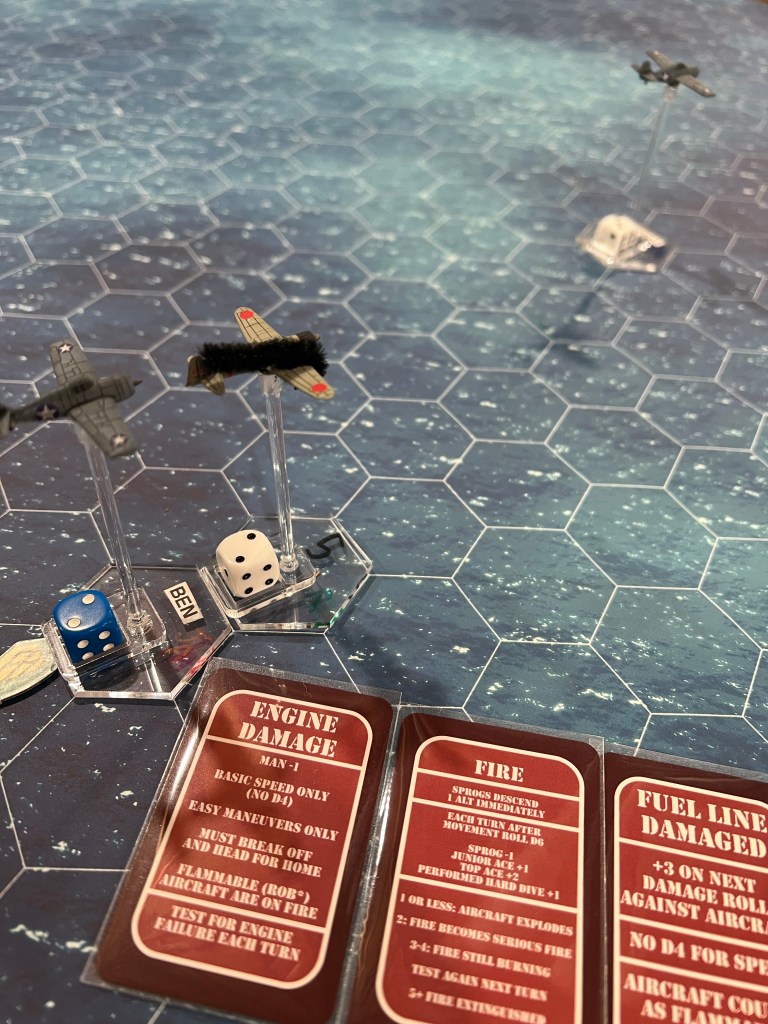
Ben, Dan and Bastard quickly close and shoot by the zeros. Ben leads the flight in a tight turn back around behind the Zeros. The aggressive turn pushes the pilots down into their seats from the G-forces. Bastard slips up in this aggressive maneuver and rolls out to find himself below the Zeros and in a no-good position to fire. Ben and Dan each roll out behind their own Zero. Dan sees his chance and lets loose a long stream of hot lead into his target, which promptly erupts into a ball of flame and corkscrews down. Ben draws a bead on the wing root (where the wing meets the fuselage) of his prey and lets loose a burst. Initially he is disappointed until he spots a lick of flame in the wing. A second later he is rewarded by a blinding explosion as the Zero’s fuel tank erupts.
Meanwhile Evan and Priest manage to overshoot their target torpedo bombers and begin turning around to compensate. Frustrated by their botched attack, and worried about the Zeros lurking above them, they fail to notice a flight of three B5N2 Kates at wavetop level below. Kanai Isoroku smiles to himself as he notices that there is no American fighters between him and the carrier looming ahead.
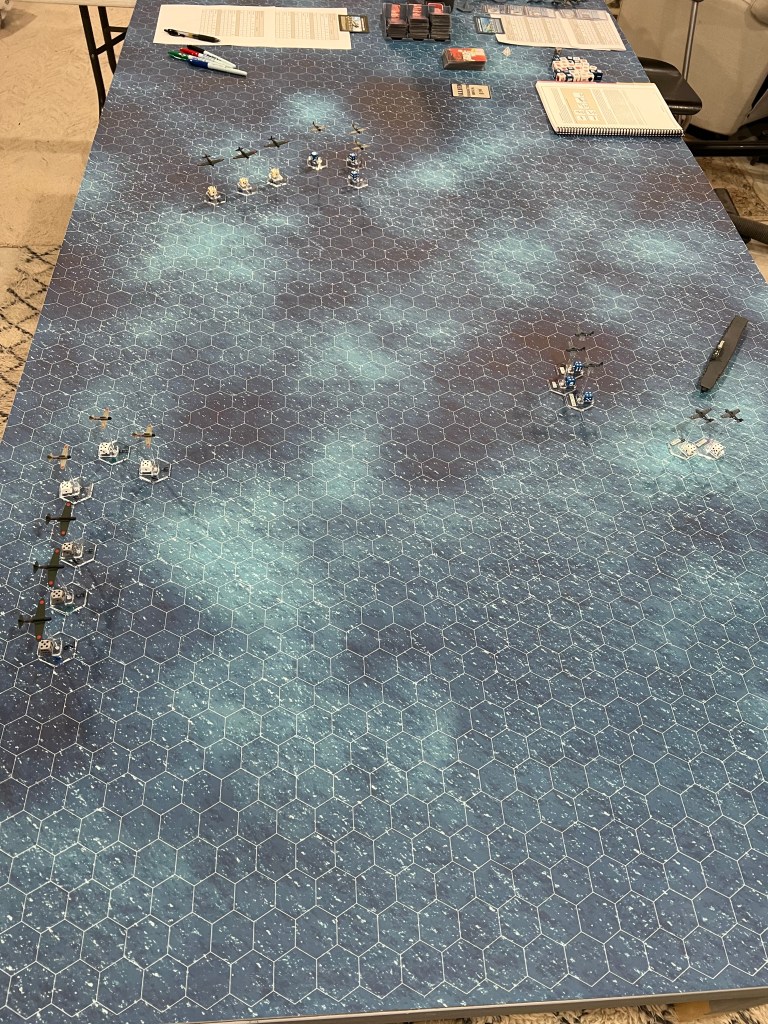


TURN ONE
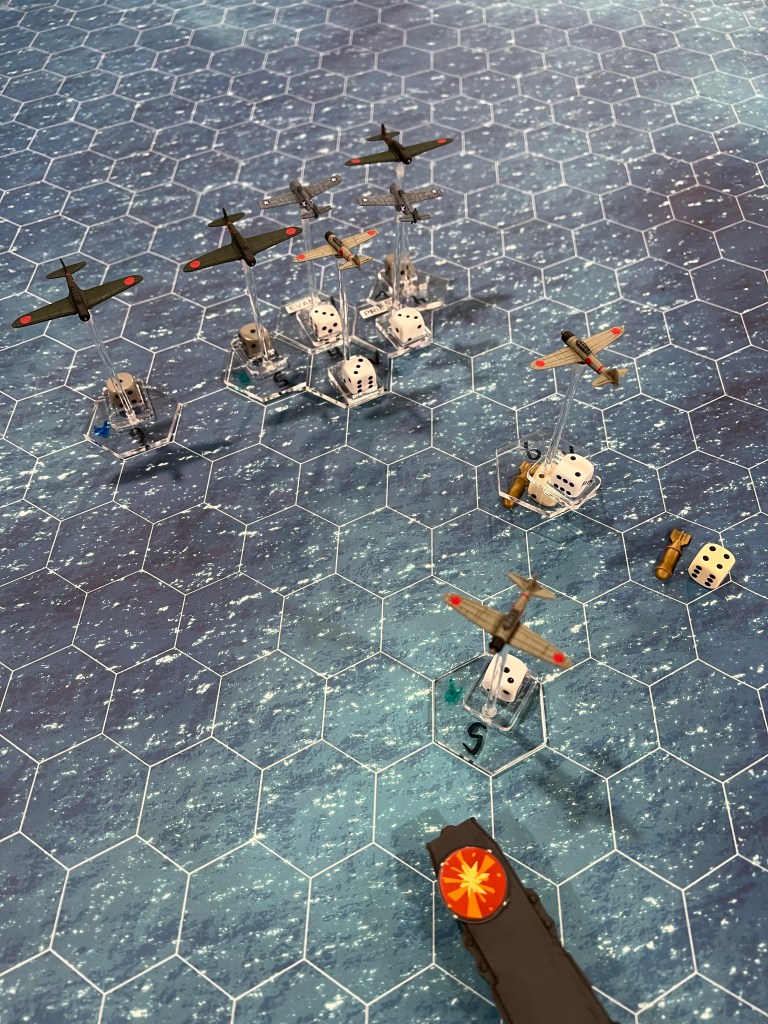
Finally an exciting first turn. Okay, maybe I had something to do with it. I opted to set up the forces a little closer than previous battles which may have been a mistake. The torpedo bombers covered a ton of ground with a Top Ace and the associated bonus card. Plus they achieved a perfect draw order by luck to give them the triple move. At speed 4 +d4 (Torpedoes incur a -1 penalty to speed) they needed it and it paid off well. Add in a descent and they got some “free” movement on top.
The VF-2 fighters had a tough setup outnumbered 12:5 against the attackers. I made a mistake when I committed Ben’s flight, the stronger of the two, to attacking the Zeros instead of the Kates. Maybe it is fitting though when considering the crushing fatigue the pilots would be under on their third combat sortie of the day. Regardless they had an excellent setup with activation order and were able to destroy two enemy planes in quick order. Evan and Priest fared less well with bad timing of activations on top of ending up alone against both flights of Kates and a flight of Zeros.
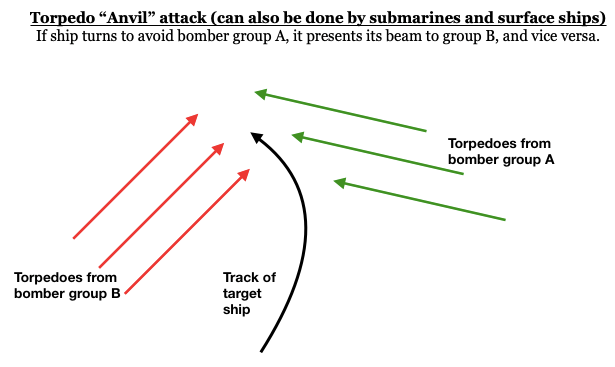
The torpedo bombers ended the turn closer than the allied liking to the carrier, and lining up a good anvil attack in the process. For those of you who are not familiar an anvil attack is one in which the attacking bombers attempt to leave the target ship no option for escape. When only attacking from one direction the ship could have the chance to turn hard into oncoming wakes and end up between the torpedoes, a strategy known as “combing” the torpedoes. When bombers attack from two or more directions the idea is to leave the target ship “no way out”. We’ll see if the torpedo planes (and by extension me playing Bag the Hun!) can pull this tricky attack off.
Alarms sound on the deck of the USS Lake Erie as the flak guns that remain operational turn and take aim at the approaching torpedo bombers. They let loose and black puffs begin to appear near the bombers. In the cockpit of the Kates the pilots grit their teeth and fight through the rocking explosions, their willpower alone carrying them through the hail of allied flak. Kanai Isoroku notices the other flight setting up a good anvil. He edges his plane closer to the water, and judges his aim on the carrier ahead. When his instincts and experience tell him it is right he released his torpedo, his flight following his cue and releasing their deadly cargo. Nearby the second flight does the same. All six bombers begin a climbing turn away from the attack, and Isoroku notices an American fighter zip by. “Too late American” he thinks, “Too late”. The Captain on the USS Lake Erie sees his situation clearly. He sees only one option and orders full speed ahead.
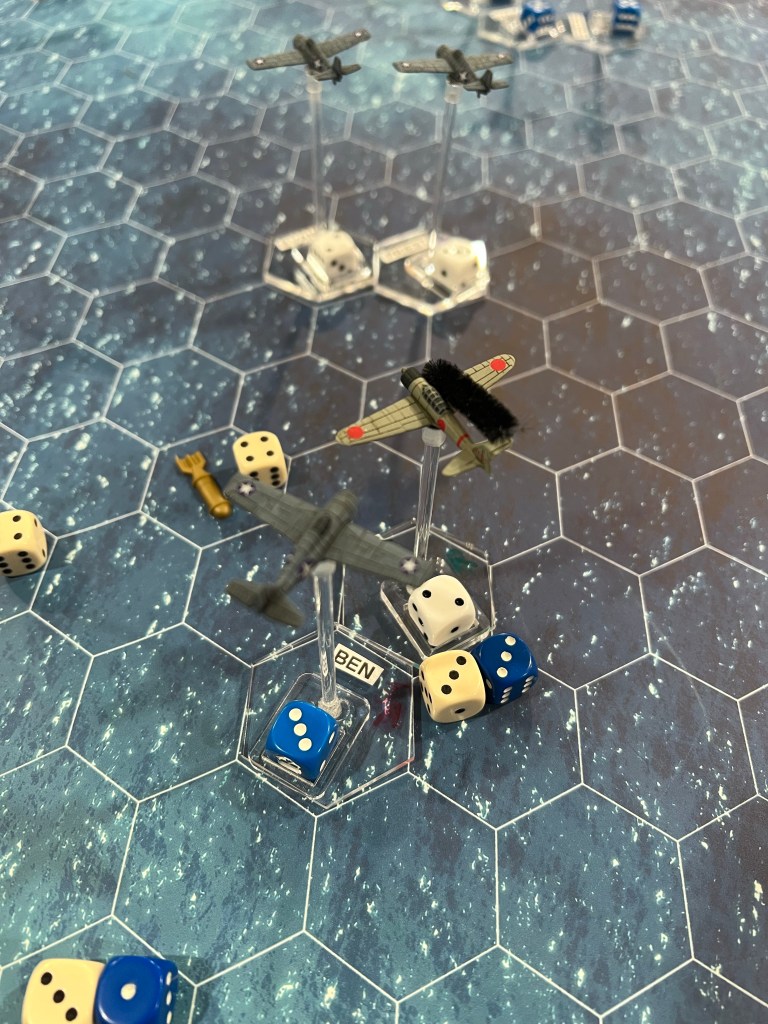
Bastard is frustrated, he watches Ben and Dan make their kills and the remaining Zero turn hard into Dan trying to get behind him. Dan turns in and the two move off in a twisting dogfight. He shoves his throttle forward and starts a turn, with any luck he thinks he might be able to get the fighter before Dan does. Ben looks around and he’s alone only seconds after his kill. He looks and sees Dan and Bastard wheeling with a Zero in one direction and sees the unopposed bombers in the other direction. He turns and starts a dive towards the bombers, hoping he won’t regret his decision later. Yet Ben is too late, he sees the bombers loose their torpedoes as he passes behind them. Undeterred he sees a chance to help out Evan and Priest ahead and puts a Zero in his sights.
Evan and Priest try again to line up on the bombers, and they miss it again. Evan feels the exhaustion creeping in and tries to keep his frustration in check. The second flight of escorting Zeros see a chance to make an attack on a pair of Wildcats and go on the offensive but it is not meant to be as the attack falls apart. One Zero does manage to get behind Evan but is quickly disrupted by an attack by Ben. The Zero pilot abandons his attack after hearing the sound of impacts and seeing his windscreen turn into a cracked mess.
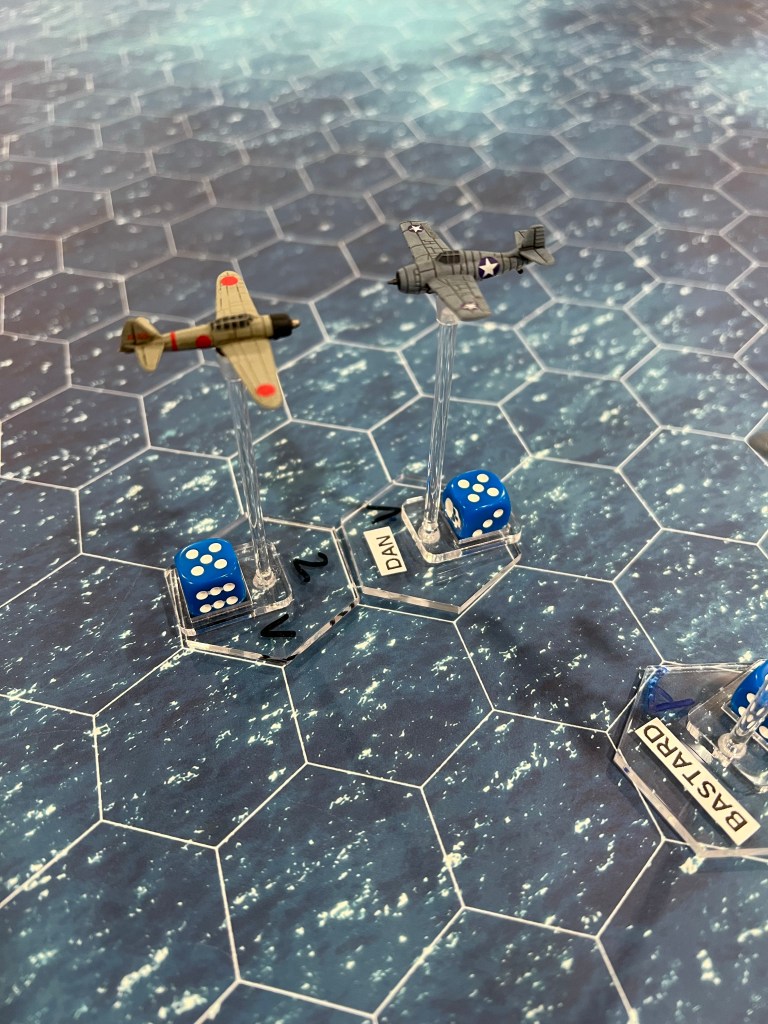
Dan and Bastard tangle with the lone Zero. Abruptly Dan has a chance at a head on pass but it doesn’t result in a kill. Bastard curses as sparks and impacts rock his Wildcat looking out to see his wing severely damaged. He makes the best evasion he can and sees the Zero swing by with Dan close behind.
His tail gone Evan turns around to find some Zeros trying to turn away with the bombers. With Priest close behind Evan lays into one of the Zeros only to find his guns have jammed after only a few rounds. He slams his fist on the sidewall of the cockpit, his frustration getting the better of him. The Zero he was firing on, the pilot with a cracked windshield, turns his aircraft around to attack his assailant but is unable to get a good shot through his cracked windows. He opts to turn back for his carrier instead.
On the USS Lake Erie the crew anxiously watches as the torpedoes pass both starboard and port of the bow, as well as several passing astern. Near the aft port quarter an anti-aircraft gunner looks on in horror as a torpedo makes a slow curve towards the ship. He winces as there is an audible impact from the torpedo….yet no explosion follows on. A hit to be sure, but also a dud. The USS Lake Erie escapes the anvil attack with only a dent as punishment. A lucky day to be sure…


TURNS TWO & THREE
Turns two and three were action packed and really blended together in game, so I opted to combine them for the report. Let me start by saying being a good torpedo bomber pilot is not easy in Bag the Hun!. This was my first honest run with the rules, only one torpedo made it into the water in chapter two and it was a clean miss anyways. To be effective you need to plan out the right distances and predict where your target will be and how they could evade and well…. it seems to do a good job at making many of the decisions points of historical accounts accurate. As you read above of six torpedoes only one hit. That hit was a lucky drift roll that saw the torpedo drift a net one hex to its own left. That happened to be the hex with the USS Lake Erie in it. Another torpedo ran too deep immediately, and the remaining four missed cleanly (though one just barely). I can’t wait to get my hands on these rules again and try my hand at piloting some torpedo planes in the future, specifically the six (soon eight) TBF Avengers I have painted up.
Meanwhile Evan and Priest continued to just have a bum run. They never seemed to be in a good position when their cards came up, and when they finally had a shot a smattering of ones on the dice ruined it. (Rules Note: Guns jam when you roll more 1’s than 5’s and 6’s combined during an attack).
Ben tried to make a run on Isoroku’s flight of Kates but their move card was drawn before his fire card was. He then had a chance to move again and then fire, which is how he put hits on the Zero tailing Evan.
Dan and Bastard tangled with a stubborn lone Zero. Dan had a head on pass but that’s not an easy shot to make and it landed no hits. The Zero managed to get on Bastards tail and give him the damage result of ‘Aileron / Wing Damage’.
So my initial idea of closer forces resulted in the torpedo attack being over on turn three. Unintended consequences I suppose. I think the setup I used in Chapter 2 was too much, and this too little but hey nothing is perfect in real battles either right? Read on to see if the VF-2 pilots can do any mopping up.
Ben is hunting. He searches for a good target….there it is. A lone straggler Zero is trying to work its way back out of the combat area to join up with the retreating bombers and fighters. Ben surges in on the attack and quickly gets a clean shot. The Zero seems to be oddly content and makes only minor moves to avoid the attack. Unknown to Ben the pilot is new and inexperienced. Unfortunately for the Japanese airman, Ben is not. Ben’s first and second burst cause the pilot to lose control as his engine sputters momentarily and a spurt of flame appears. The smell of fuel fills the cockpit as the pilot struggles to get his plane under control. He manages to get the fire extinguished and throttles back only to hear the sounds of impacts. Ben makes a second pass on the burning Zero, exhausting the last of his ammo. Moments later the flames start anew and the Zero explodes in midair seconds after.
Bastard turns for the carrier, angry and alone with his damaged Wildcat. Evan and Ben join up for a moment and decide to return to the carrier and cover for Bastard who is approaching. Evan’s guns are jammed and Ben is out of ammo…their fight here is done. Evan instructs Priest to go help Dan.
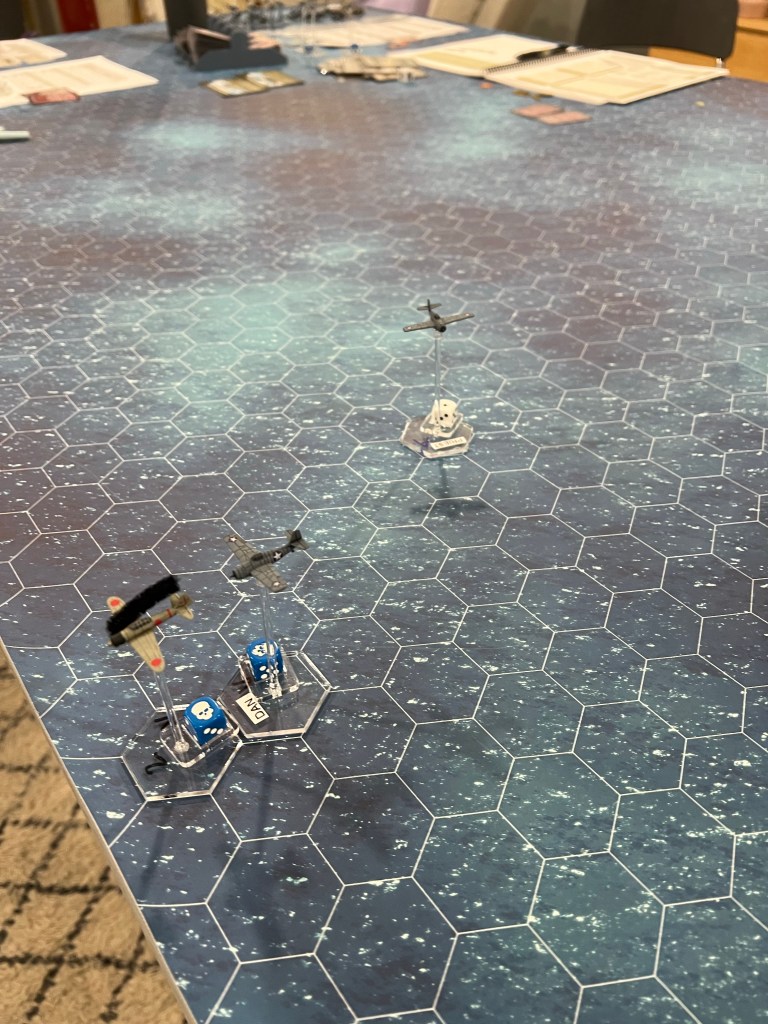
Dan and the Zero twist and turn around each other slowly getting lower and lower. Priest screams into the fight as well. Eventually Dan looks down and sees the Zero below him. He immediately turns into a dive and makes an overhead pass at the slippery enemy. Dan’s round impact the cockpit area, ruining the windows and leaving the pilot struggling to see. The Zero won’t give up so easily though and Dan, Priest, and the Zero turn, twist, roll, and dive until they are fighting just above the dark blue waves of the Pacific Ocean. Finally, Dan sees a chance, for a split second he gets the Zero in his gunsight. Without hesitation Dan lets a burst go and is rewarded with a spurt of flame. The Zero makes a turn the wrong way and Dan is able to make a second attack, one which causes the Zero to flip out of control into the water just below. The fatigue hits Dan like a wave as he turns for the carrier realizing the battle is over and also realizing he still has a place to land. “Good thing too” he thinks, eyeballing the fuel gauge that is getting quite close to empty.


TURNS FOUR, FIVE, AND SIX
The final three turns of the game didn’t see a lot happen. In fact by turn 5 only three planes were left in the air and fighting: Dan, Priest, and the wonderfully resilient Zero that proved to be a great foe. It pretty much went as I described it above in the narrative section. The combatants had a running turning fight going. It’s not an ideal way to fight the Zero, but both planes have the ability to turn a hex face at the start of movement. The Zero’s one extra speed means it should have a chance to slowly win the fight on paper, but in reality it doesn’t work out so perfectly. The variability in the d4 speed dice makes a lot of difference, and in Dan’s case luckily gave him the ability to keep up with his opponent.
The Break Turn maneuver got a lot of use here. It costs 4SPD and allows the plane to move forward one hex, turn left or right, move forward another hex, and turn again in the same direction. Then the pilot rolls a dice and on a 3 or less will lose one altitude. For reference a normal turn in game costs 3SPD and allows the plane to move forward one hex, turn left or right, and move forward one hex again. The Break Turn allows you to turn an extra time, for the cost of 1 more Speed and the risk of altitude loss. In the fight between Dan and the Zero both planes kept losing altitude in Break Turns, making them slowly spiral down. A Zero is guaranteed two Break Turns if it wants it (7SPD+d4, which means a speed budget of 8-11), a Wildcat is not (6SPD+d4, range of 7-10). Dan rolled high on his speed, but it wouldn’t many bad rolls to let that Zero out turn a Wildcat.
In the end the USS Lake Erie survived, but VF2 had a pretty poor showing in my opinion. They did kill four Zeros, but had the torpedoes lined up better the outcome could have been disastrous. To this end I deemed it ‘Unlikely (3 or less)’ that they will get a glory point. Maybe they’ll get credit for going up against all odds, but it’s more likely the sound of the torpedo dud will ring louder in the ears of their home ship. A roll of 8 means no glory today.
Bastard managed to land his damaged plane without a problem (roll of 6 on a 5+ needed for no problems). It will however need some work to get flying again. The squadron’s other damaged plane, Wildcat 3, is also still undergoing repairs. A roll of 1 on a 5+ needed to return to service left it out of service still. However next time it will only need a 4+. Dan achieved his five kills and was found ‘Very Likely’ to advance to the skill level of Jr. Ace, which he does.
Sometime after the battle as the carrier force reforms and heads for Honolulu a submarine surfaces nearby with a pilot for the USS Lake Erie. To the joy of the squadron it is Ensign Mike Charge, who miraculously survived his plane exploding in mid-air. His squadron mates had assumed he was dead and he is welcomed back with open arms giving the squadron a morale boost. Another morale boost is earned when the squadron learns more of the crushing defeat the Imperial Japanese Navy received at Midway. Finally some hope of victory in the dark months after Pearl Harbor.
The next article will cover VF-2’s rest and recouperation in Honolulu. Using the Squadron Forward supplement we’ll see if the pilots get themselves into trouble or can behave on shore.
-Evan

Looks and sounds a good game! 🙂
LikeLike
It was good fun and I was able to get it done in one sitting which is a rarity
LikeLiked by 1 person