

You’ll notice pictures of a sandy beach in this article. At the time I was camping on a barrier island and decided it would be a great time to build a model and write an article. I had a fun schtick about a Tiger in the sand or something when I started this article. I thought it would be clever. A Tiger crossing the Atlantic Ocean… American shores… I don’t know. But that was a year and a half ago… Well, things never go as planned; although time with my kids was more important. As my fellow dad hobbiests know, kid time comes first. But I did manage to pluck away on the kit in a few spare moments before shelving it when I got home, half done. Then I picked away at the model and ended up finishing it up a year later. Not my fastest build but oh well. But, without further ado, the Rubicon King Tiger.
The Kit
I picked this King Tiger up at Kick Ass Mail Order, my FLPCD (Friendly Local Plastic Crack Dealer.) The Konigstiger is packaged in one of, if not the, largest Rubicon boxes. The kit contains parts to model an extremely detailed interior and the package is filled to the brim with bits. This makes the King Tiger a perfect kit for both the scale modeler and Wargamer. Serious hybrid points for this kit.
Additionally, the kit includes five crew members to complete the interior of the tank.
This particular kit depicts a King Tiger without the zimmerit anti-mine paste, though Rubicon does make a variant with the coating.
The box is the typical Rubicon standard showing off pretty art work depicting a King Tiger of the 505th Heavy Tank Battalion on the front. The unit’s charging knight emblem is prominently displayed and very titillating. The back of the box has some quick history on the vehicle and a look at the included decal sheet.

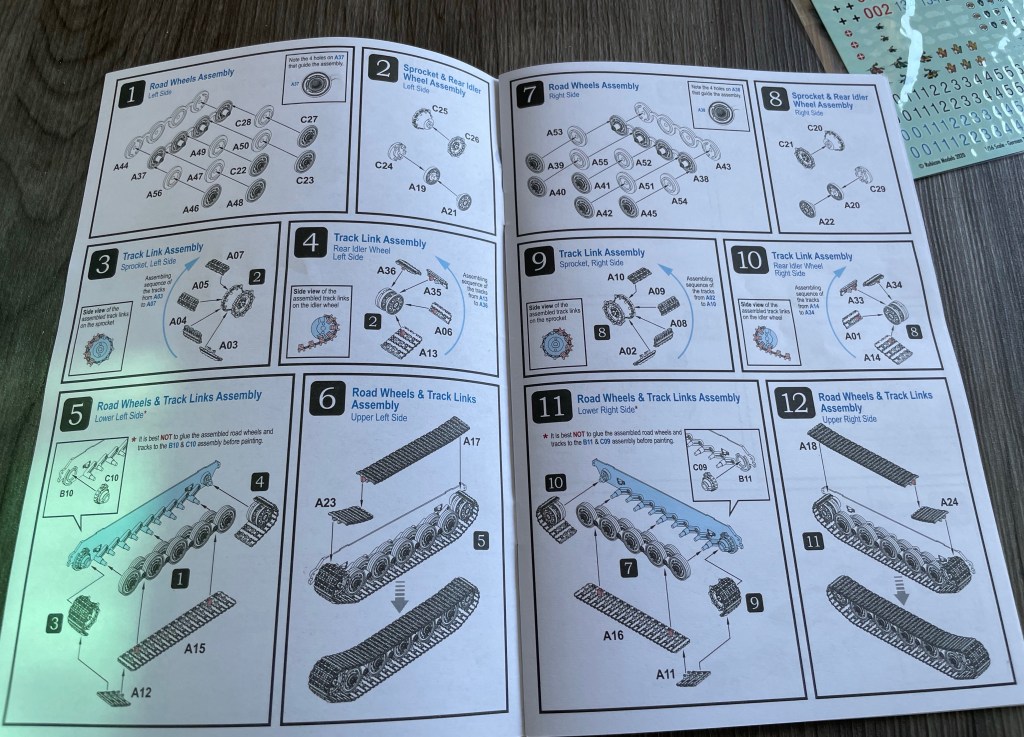
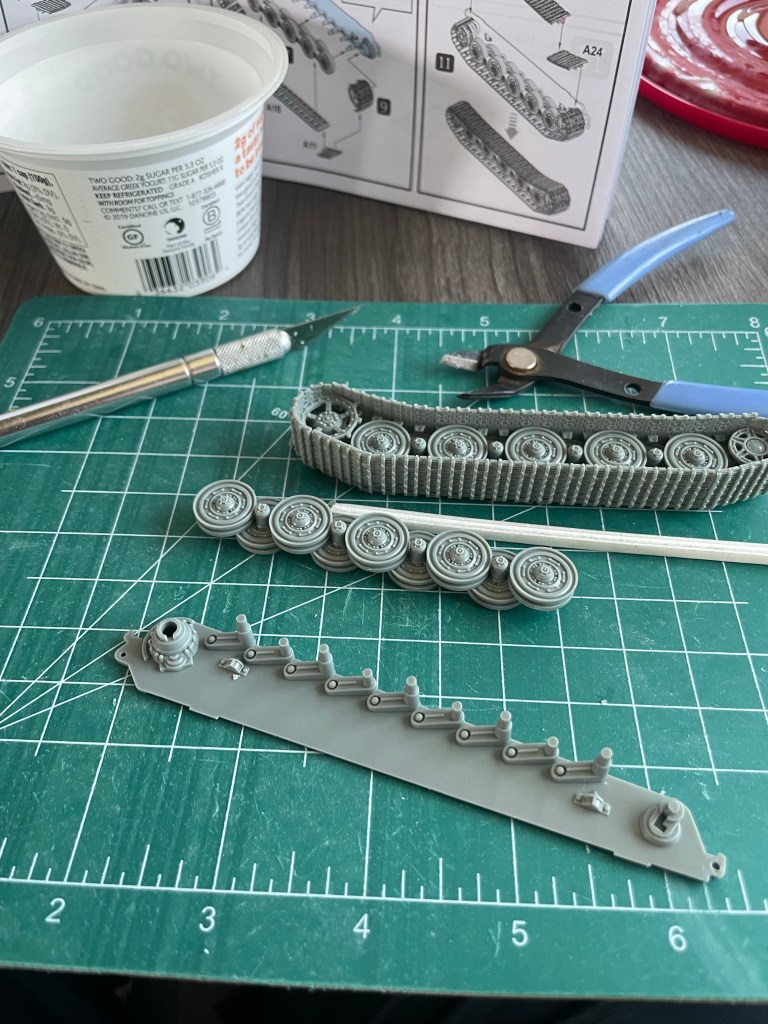


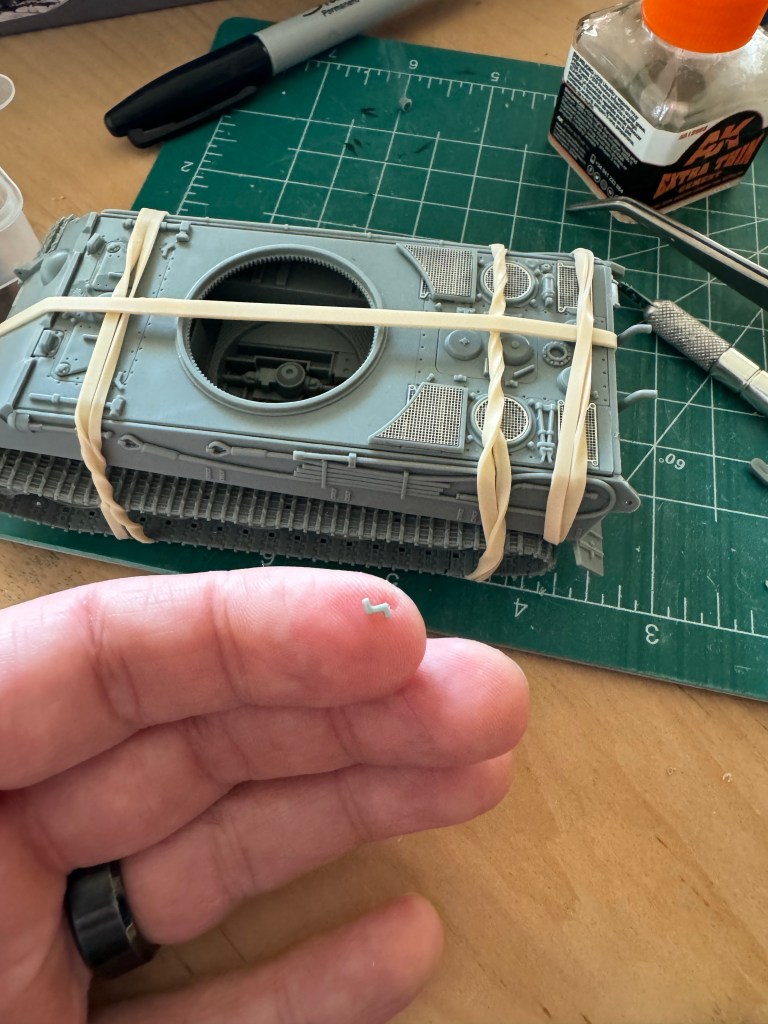
Now I am not an expert modeler, but I can hold my own with a hobby knife most of the time. That said the King Tiger kit was a beast. Rubicon’s website lists 242 parts across five sprues inside the massive box. The components fit together well with only the joining of the upper and lower hull pieces needing a little rubber band persuasion. I don’t think it was an issue with the kit so much as that the part got a bit twisted inside the packaging and developed a memory of that shape. You’ll notice a few photo-etched air intake grilles. The inclusion of photo-etched parts is pretty rare for a wargaming model, but it is a super nice touch.


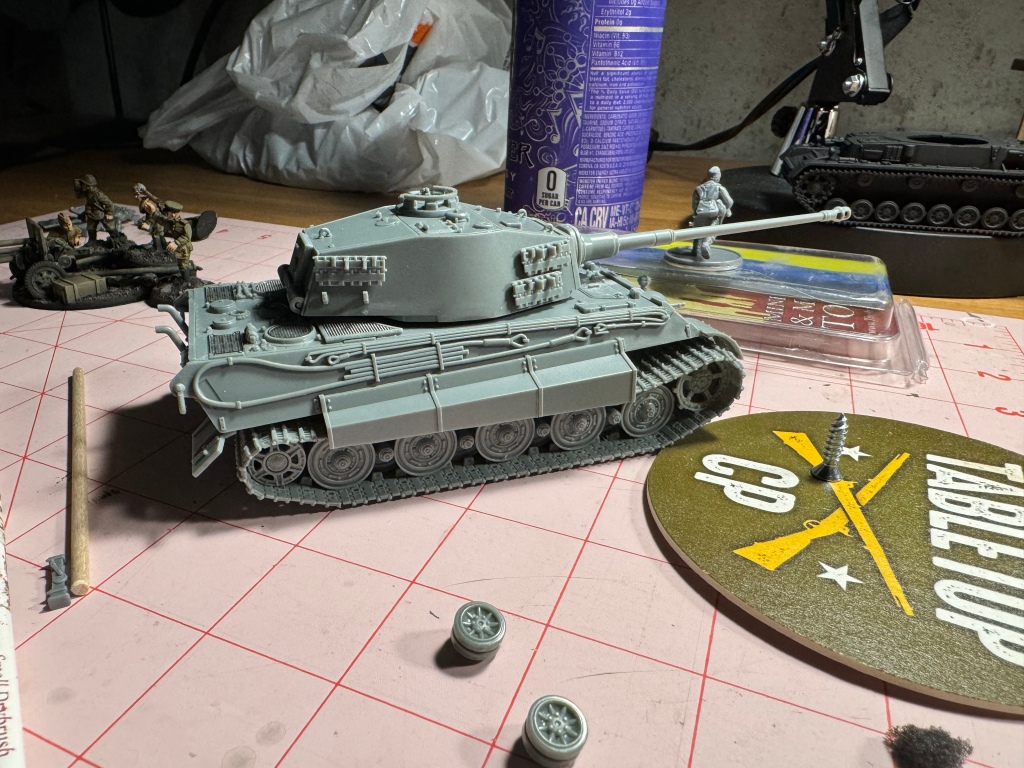
I did not complete the interior portion of the kit as I am planning on using this kitty for wargaming. I did however make some alterations to the side skirts to show some wear and tear. Once completed the King Tiger is huge and it’s heft feels really good in your hand.
In Chain of Command
So the Konigstiger is a big kitty. But how does it look on the table? Costing a whopping 16 support points, the King Tiger is at the top of the food chain in Chain of Command. It has an armor value of 14, meaning you have lots of dice to roll ones on… just kidding it’s nigh impenetrable. Not only is it tough, the long barreled 88mm is an absolute bushwhacker with 16 AP dice or 7 HE dice. This vehicle is almost click and delete. If you hit something there is a good chance it’s dead. For anti-infantry work the King Tiger comes standard with hull mounted and coaxial machine guns. Fear not, your 16 support point investment should give you some hefty punch.
Heavy Armor means your opponent’s side shots need a 5 or 6 to penetrate and the rear needs 4-6 to penetrate. Normally a side shot counts as penetrating with 4-6 and a rear shot with 3-6. Having heavy armor is a pretty significant advantage.
Unsurprisingly this tank has a mobility rating of slow. This isn’t really big deal as you shouldn’t be expecting a 69 ton speed demon. As the tank design triangle has taught us, you can’t have firepower, armor, and speed.
The due to its massive size this beast strains its drivetrain while moving about the battlefield. The King Tiger counts as Unreliable due to its mobility issues. If an Unreliable vehicle rolls double ones when moving it will break down. It can then no longer move for the duration of the game but may still rotate its turret and use any weapons it has. Additionally, any broken-down vehicle takes double shock.
The King Tiger also has smoke dischargers which allow it to deploy a 6″ x 3″ smoke curtain 6” directly in front of the hull. This is a nice trick to have up your sleeve a tank this large is pretty hard to hide.
In Bolt Action
In Bolt Action the King Tiger is a force on the tabletop and it has a points cost to match. A regular Tiger II will cost you a cool 440 points while a veteran is a whopping 528 points. It cannot be taken as an inexperienced unit, at least not from the Version 3 Armies of Germany book. We will see if that changes when the theater books come out.
For the big point investment you get a turret mounted super heavy anti-tank gun (+7 pen, 3” HE) with an 84” range. It also has coaxial, hull, and pintle (for +15 points) machine guns. They benefit from the “Hitler’s Buzzsaw” special rule spewing 4 shots each at ground targets or 7 at airplanes. Notably a veteran King Tiger can be your “Panzer Ace” granting it another +1 penetration (for +8) and +1 on the damage chart. Whewwwww!
Defensively the King Tiger totes a scary armor value of 11+. For the low low cost of roughly half your 1000 point army you get an incredibly tough big stick.

The History
So now the history fun begins. But first a note. I’m an armchair historian (nerd) and my aim is to chat about what I learned about the Tiger II. I’m shooting for a little lower than bird’s eye view. There is a literal ton of literature on these big beasts from people much more qualified than I am. If I get something wrong, my bad. I shall commit Sepuku for the honor of the Iron Dice.
Tiger IIs, also known as Tiger VI B, King Tiger, Königstiger, and Bengal Tiger, were issued to Germany’s Heavy Tank Battalions. The vehicle saw service with both Heer and Waffen SS units. It was armed with a long barreled 88mm KwK 43 main gun and a pair of MG34s in the coaxial and hull positions. A full ammunition compliment was 86 main gun rounds and 5,850 7.92 mm rounds.
Like many German armored vehicles before it the Tiger II had a crew of five. The crew consisted of a driver, a radio operator, a gunner, loader, and the tank commander. The beast carried a thick pelt to protect its crew. The thickest armor was 185mm (~7.25”) thick. 492 Tiger IIs were manufactured from mid 1944 till the end of hostilities in the ETO.
Now, these statistics sound impressive but the King Tiger was far from a perfect tank. The 69.8 ton vehicle proved to be underpowered and unreliable due to drive train component issues. They also had new double linked tracks where the drive sprocket engaged only every second tooth sprocket. This arrangement caused heavy jerks while steering which would damage the tank’s final drive. The new tracks also were susceptible to breakage from sideways movement strain encountered in rough terrain.
A production run of 492 vehicles isn’t nothing. 492 large and powerful, even unreliable, vehicles helps a war effort. But really it was way too little to make a definitive difference.
Due to maintenance issues most Tiger II battalions arrived without a full compliment of tanks. Mechanical engineers were able to make improvements during the production life of the vehicle and its reliability increased but as is with most so-called German “wonder weapons” these improvements were too little too late.

Pretending that my little King Tiger arrived to my depot in a serviceable state I had to decide which unit it would belong to. I ear marked this kitty for service on the Western Front but versatility is a bonus. King Tigers were pretty iconic during the Battle of the Bulge and we had an event planned for action in the Ardennes at Adepticon 2025.
Most of the heavy tank units in the Ardennes were Waffen SS. I preferred to have it represent a Heer unit. One theater appropriate Heer unit was present, the schwere Panzerabteilung 506 or the 506th Heavy Panzer Battalion. They fought on the north eastern side of the offensive, frolicking in the Belgian and Luxembourger country side. They traded blows with American tankers fighting their way to the beleaguered Bastogne bastion in late December and early January.
Handily the 506th also saw action with their King Tigers during Operation Market Garden, on the Eastern Front, and in the last days of the war in Germany. This means big bang for my buck for unit versatility.
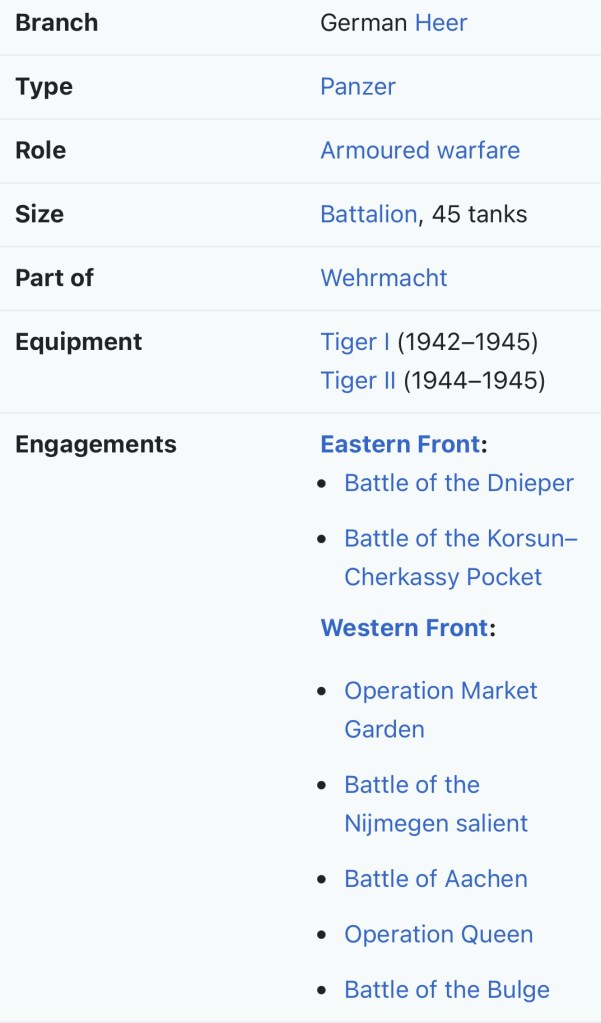
With a unit selected it was time to dig into the books and internet. The unit history shows a tale of the 506th being almost a “golden boy” unit. The unit was formed from the 9th Panzer Division’s Panzer Regiment 33 on July 20, 1943. They were issued a full compliment of 45 Tiger Is. This is very abnormal as initially almost all Heavy Panzer Battalions were issued a split of Tigers and Panzer IIIs. The Panzer IIIs were used to bulk out a battalion as there typically weren’t enough Tigers to fully equip the rapidly expanding heavy tank units. The 506th repeatedly received priority replacement of their vehicles and hovered around full strength till the very end of the war. Most other heavy panzer units were ground to a pulp, being plagued by mechanical issues and combat loses. I have read several anecdotes of less than a platoon’s worth of tanks remaining in a “battalion” unit.
The 506th received 45 new Tiger II tanks between August 20th and September 12th 1944. It was then sent to the Netherlands where it took part in the fighting near Arnhem and Nijmegen. It fought in heavy combat through Operation Market Garden and then again near Aachen, Germany before being shipped off to the Ardennes.
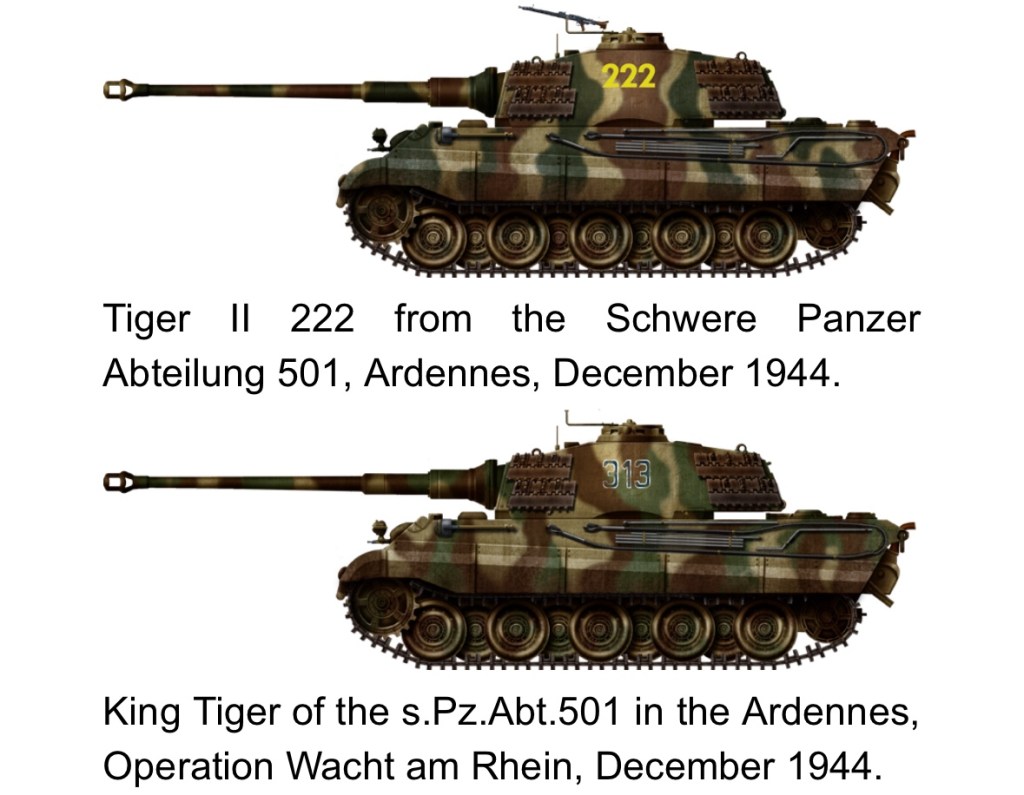


The 506th’s heavy armor sported several interesting camouflage patterns. Both hard edged and soft edged camouflage patterns appear to have been used at various times.
Seeing as this Tiger II will be a part of my Battle of the Bulge German force I needed to decide if I’d white wash it. In the end I decided like my Night Sky Miniature Jagdpanther it would not receive a white coat. Historically speaking, most vehicles on both sides at the beginning of the Battle of the Bulge were not white washed as there was not enough snow in most sectors to make it effective or necessary. In my understanding pictures showing white washed armor are typically from after Chrismas 1944 and into January 1945, well after the battle had begun. That said, most participants were too busy to take photos so anything is possible.

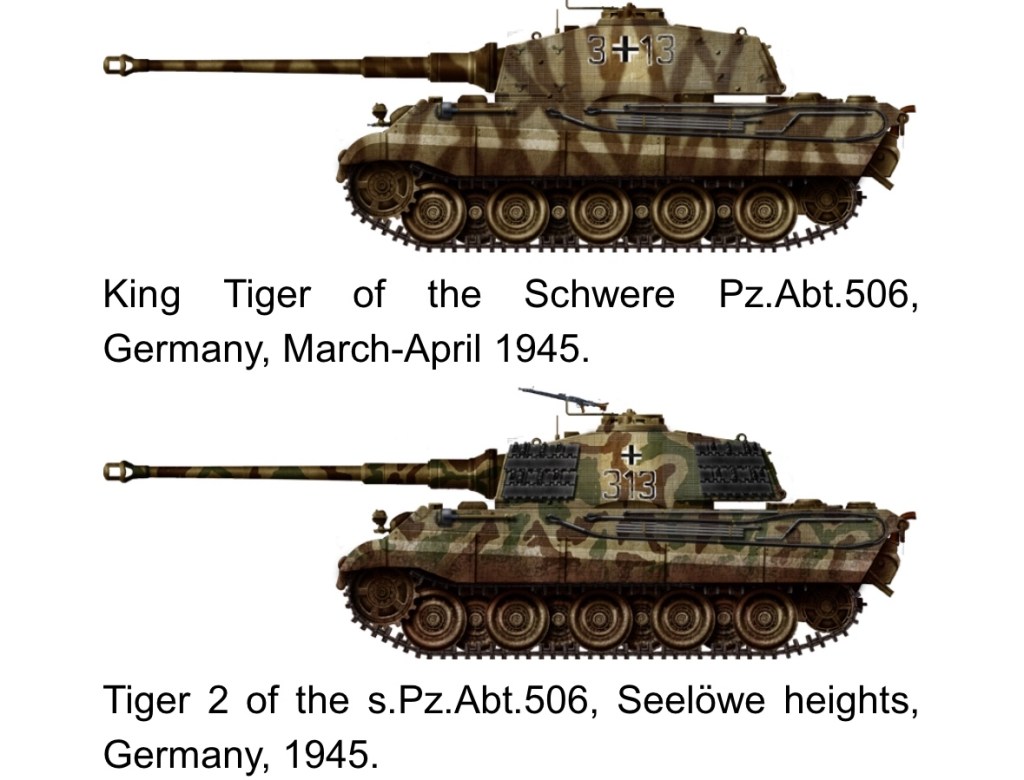
While I liked the above Seelow Height’s paint scheme I will be saving it for another King Tiger (though the thought of building another makes me shudder.) Instead, I am basing my Tiger II on the 506th Ardennes scheme pictured below. Actual pictures of the unit’s Konigstigers in the Ardennes are hard to come by. Again I guess no one had time to snap photos during the dash to the Meuse River.
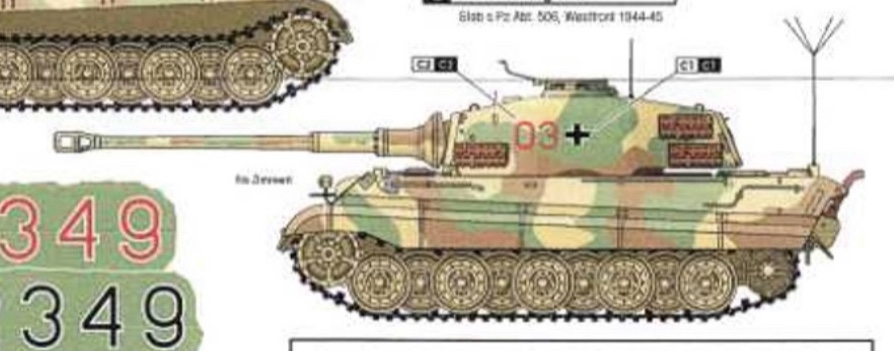
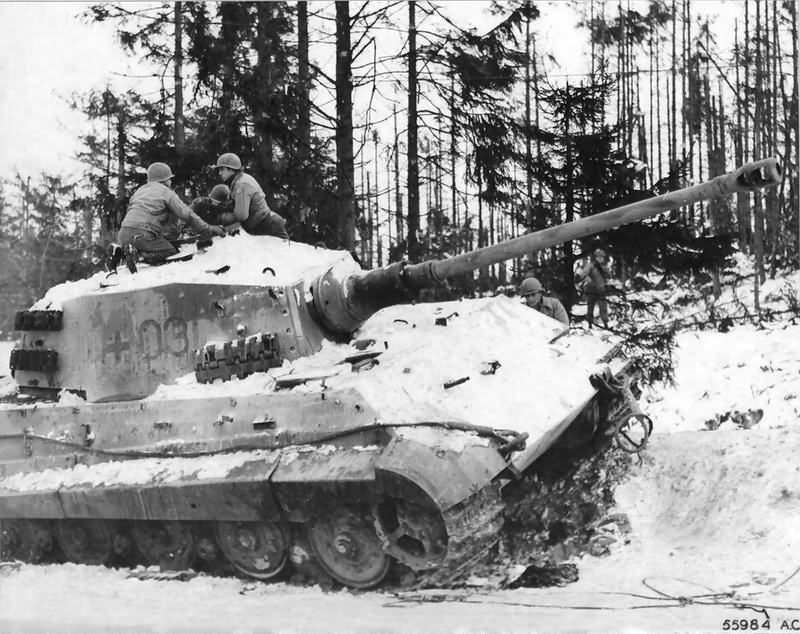
Interestingly, I found a photo of this tank which appears to have been taken near Bastogne. It is denoted as a Panzerbefehlswagen Tiger II Ausf. B. Note the “03” identification number. The two digit with lead of “0” denotes it as one of the battalion’s headquarters tanks. More on that further down. These designated command vehicles had some main gun ammunition and machine gun ammunition removed to make room extra radios and an auxiliary generator. Radios needed the extra power to run when the tank was off. The only external visual difference from a normal King Tiger are extra antennas. For trivia, every 10th Tiger II was planned to be a command variant. In reality it was every 12.
The 506th had a unique vehicle identification numbering scheme. From the time of its formation the heavy tank unit used one or two digits to identify a company’s tanks from 1-14. Battalion HQ tanks were 01, 02, 03. This was somewhat abnormal as German vehicles typically sported three or four-digit identifier numbers. The paint color of the numbers denoted the company; black for the HQ, white for the first company, red for the second, and yellow for the third. Simple but not overly identifiable for operational security’s sake.
After companies one, two, and three were re-equipped with Tiger IIs the number scheme was altered. A prefix digit was added to signify the company, 1, 2, and 3 respectively. The first company had black numbers, second had black with white outlines, and the third had black with yellow outlines. A fourth company of Tiger Is was added and they had black numbers 1-14 with green outlines.
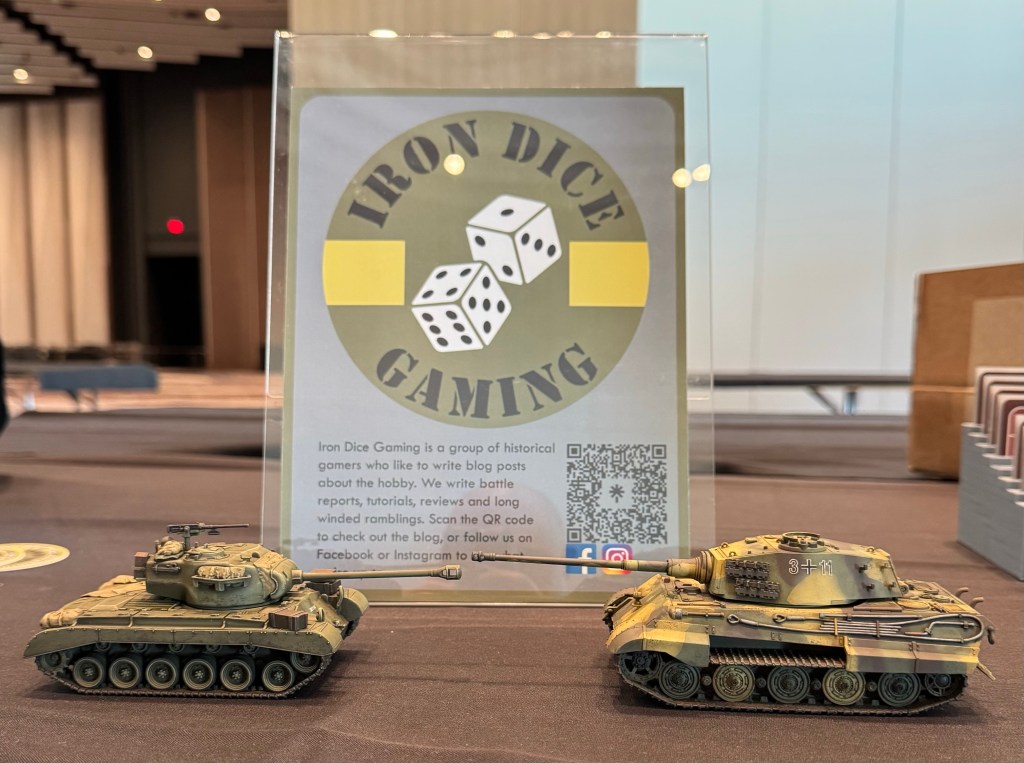
As a note, I ended up modeling the 3rd company but didn’t have any large enough yellow outlined digits so the tank’s numbers are white outlined. Oh well… its identity crisis will be our little secret.
The Painting Process
With a camouflage scheme selected I set off to put some paint on plastic. To start I primed the tank with my trusty Rustoleum Painter’s Touch black. It’s not a hobby specific paint but it works well.


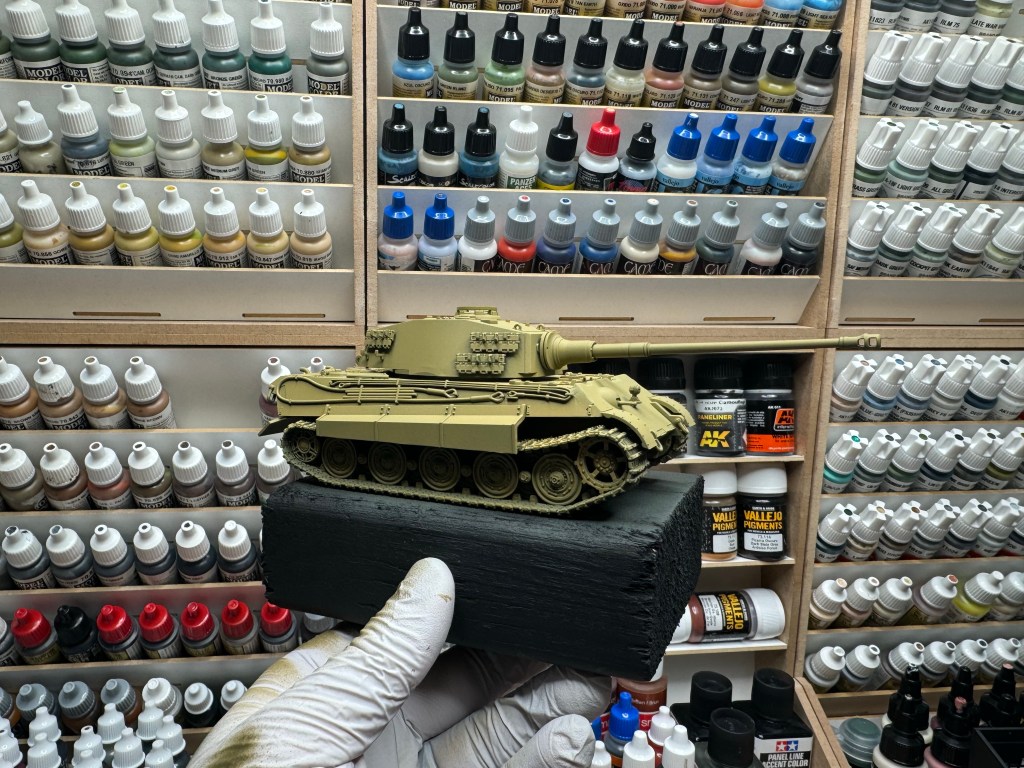
Truth be told I waffled on the paint job for a long time. I used the Dunkelgelb modulation set from AK interactive for the base yellow. This gave the base coat some nice variation. Annnnd then…. I did nothing with the King Tiger for a while.
Embarrassingly, the Tiger II sat in Dunkelgelb for some time. I finally hit the gas and committed to the scheme when we “needed” some heavy armor for Adepticon 2025. Evan had challenged me (or rather chided me) to get the tank painted for a “what if” duel with his American Pershing heavy tank. I say “what if” as the two heavy tanks never actually faced off in combat.

Next it was time for the camouflage. I used AK’s masking putty to mask off the camouflage patterns. For the first color I selected a darker red brown, Vallejo Model Air 71.041 Rotbrün, RAL 8017. This shade of Rotbrün is seems to have a hint of burgundy tone. As luck would have it I didn’t write down the green used but I am 90% sure I used Vallejo Model Air 71.015 Dunkelgrün. I then added a bit of an AK light tan to the base colors and modulated the main areas. I think it was AK11115 Light Earth but I didn’t jot it down (again…)
Next Vallejo gloss varnish was airbrushed onto the areas I planned to add decals on the turret. I was struck by how spartan the King Tiger’s markings were. A set of ID numbers and one German cross per side. I chose to represent the 11th tank from the 3rd company.
Decals were from the supplied Rubicon set as well as District Miniatures. Sadly the 506th’s King Tigers didn’t sport the units iconic W and Tiger emblem. Those were only found on prominent displayed on the unit’s Tiger Is. I guess it’s an excuse to buy another tank… oh darn.

Clean decals stick out like a sore thumb. To remedy this the markings were dirtied up with undiluted Army Painter Strong Tone. This knocks the bright white down to a reasonable level.
Seeing as our tank wasn’t going to be rolling right off the factory floor it needed some wear and tear. Chipping was applied with an irregularly torn piece of foam with a 5:1 mix of Vallejo Black Grey and Vallejo Mahogany.
The tracks and spare links were done in Vallejo Black Grey with a wash of 1:10 Vallejo Red Leather to Vallejo Airbrush Thinner. Tank tracks are never rust free and a red leather wash gives a nice rusty look. They were then dry brushed with Vallejo Gun Metal. This provides a nice raw metal look for areas rubbed to bare metal.
Finally, I painted the stowed tools and cables with Vallejo Beige Brown for the wood and Gunmetal where appropriate. The tow cables and spare track links do a nice job of providing some visual interest with the juxtaposition against the camouflage.
An all over gloss varnish was applied. Once that cured a coat of AK Interactive DAK enamel wash was sprayed on with an airbrush. I also did some small spots of AK Winter Streaking Grime to help bring a cooler tone to the filter and wash. The tracks and road wheels were airbrushed with AK Track Wash. The enamels were then tamed down with a make up sponge, paint brush, and white spirits. I left wash in the nooks and crannies and tried to drag downward on vertical plates. This gives it a nice natural look.
I skipped muddying up the tracks. Again, leaning towards versatility I didn’t want to tie the vehicle to a particular environment too heavily. That said, snow and mud would have looked fantastic on the Königstiger’s fat tracks and thick armor plates.
The last step was to airbrush on my standard matte varnish, Vallejo Mecha Matte. This ties the sheen together and gives a solid protective finish.
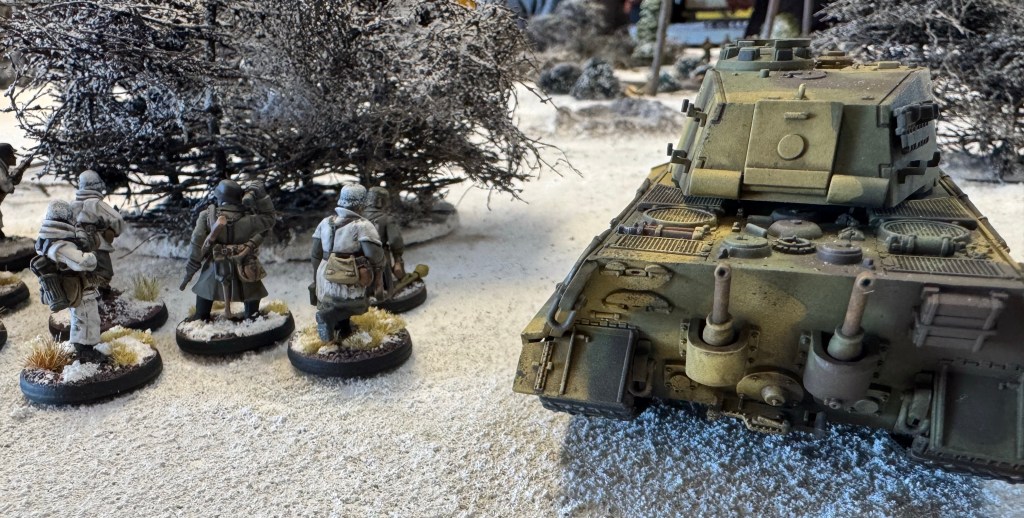
Here’s the result.
Conclusion
The Rubicon King Tiger was a beast of a kit. I really enjoyed digging into the history of the vehicle and finding a way to paint it up. The build effort was worth it as I have a huge center piece for my late war German forces from Market Garden to the Ruhr.
I’ll give the Rubicon King Tiger a full Iron Dice Recommended rating.
In case you’re wondering, 3-11’s first outing was a fitting for a center piece’s first game. Turn one saw it fire a missed shot and it received a pin in the same turn. The King Tiger did not pass an orders test for the remainder of the game. The heavy weight face off was less than interesting as the Pershing and Tiger II never saw each other. Maybe I can wedge the big girl into a Chain of Command list, but dang, 16 points is a lot…
Until next time!

Nice article and paintwork!
From my reading, Pz IIINs were attached to Tiger Bns with the aim of guarding the flanks and rear against infantry tank-hunting parties, The 7.5cm short gun was selected as it had a better anti-infantry and emplacement effect, but could still equal the long 5cm gun in an antitank battle.
Kind regards, Chris.
LikeLiked by 3 people
Thank you!
A good symbiotic relationship they had! Would be fun to game it… probably not in 28mm though.
LikeLiked by 2 people
Ooooh a tank. And a very nice model too (not out of the box, your lovely finished one).
And some history to boot, what’s not to like 🙂
LikeLiked by 2 people
Thank you, that means a lot coming from the neighborhood tank nerd. 😁
LikeLiked by 2 people
Great post with lots of interesting bits on history and the all important painting – I am not a competitive gamer but would definitely insist tiger users pay for loads of extra transport like special trains? I assume they had specific transport arrangements? Did you come across any of that stuff?
LikeLiked by 2 people
I believe you’re right. Like its cousin, the Tiger I, the King Tiger had transport tracks and combat tracks, 660mm and 800mm wide respectively for the Tiger II. Both tanks with combat tracks attached were too wide to be transported by train hence the transport tracks. I didn’t know this but they painted the transport tracks red for Tiger IIs and green for Tiger Is to not mix them up. (I’ll have to update the article!)
I would imagine heavyduty transport railcars were in short supply as well. 69.8 tons in quite a load. It’s not like they had much choice though. Long marches for the heavy tanks would be a death sentence for their drive trains.
I suppose most games represent the logistics to a degree by making them costly in points. We have also played with limited fuel rules to also represent logistical challenges. But maybe some campaign rules would be a fun addition??
LikeLiked by 1 person
Great response – always useful info if a button counter pulls you up on some model detail 😁
LikeLiked by 1 person
Excellent post, Ben, and a really nice model! 🙂 I’d never come across that arrangement of tactical numbers and national marking before (i.e. 3+11) so I’ve learnt something new. I’ve actually been inside a King Tiger – a long time ago one of them at the UK Tank Museum used to be at the Royal Military College of Science before it was moved and I had the chance to climb around it when I attended a course there!
LikeLiked by 1 person
Many thanks John! The 506th is somewhat of an odd duck all around. I can see how someone makes a career out of chasing WWII information down. I wish I would have chosen that route!
And oh my… I’m supremely jealous of your Tiger in captivity experience. That had to have been utmostly cool. My wife and I are planning our 10th anniversary trip to the UK and France. Bovington is on the schedule… I’ll paw it up as much as they will let me 😆 I doubt inside is on the table so I’ll have to settle for photos.
LikeLiked by 1 person
I think it’s about 10 years since I was there but Bovington is well worth a visit! 🙂 If I remember correctly (and I frequently don’t) they have two King Tigers on display!
LikeLiked by 1 person